# First data source: university 1
As a first step, we focus on the database of a first university. It has the schema uni1. It is composed of 5 tables.
# uni1.student
The table uni1.student contains the local ID, first and last names of the students.
| s_id | first_name | last_name |
|---|---|---|
| 1 | Mary | Smith |
| 2 | John | Doe |
The column s_id is a primary key.
# uni1.academic
Similarly, the table uni1.academic contains the local ID, first and last names of the academic staff, but also information about their position.
| a_id | first_name | last_name | position |
|---|---|---|---|
| 1 | Anna | Chambers | 1 |
| 2 | Edward | May | 9 |
| 3 | Rachel | Ward | 8 |
The column position is populated with magic numbers:
- 1 -> Full Professor
- 2 -> Associate Professor
- 3 -> Assistant Professor
- 8 -> External Teacher
- 9 -> PostDoc
The column a_id is a primary key.
# uni1.course
The table uni1.course contains the local ID and the title of the courses.
| c_id | title |
|---|---|
| 1234 | Linear Algebra |
The column c_id is a primary key.
# uni1.teaching
The table uni1.teaching contains the n-n relation between courses and teachers.
| c_id | a_id |
|---|---|
| 1234 | 1 |
| 1234 | 2 |
There is no primary key, but two foreign keys to the tables uni1.course and uni1.academic.
# uni1.course-registration
The table uni1.course-registration contains the n-n relation between courses and students.
| c_id | s_id |
|---|---|
| 1234 | 1 |
| 1234 | 2 |
There is no primary key, but two foreign keys to the tables uni1.course and uni1.student.
# Ontology: classes and properties
- Download this OWL ontology file.
- Download this mapping file.
- Download this properties file.
- In Protégé, go to File/Open... to load the ontology file (be sure you have all three files in the same folder).
- In the tab Classes you can visualize the class hierarchy
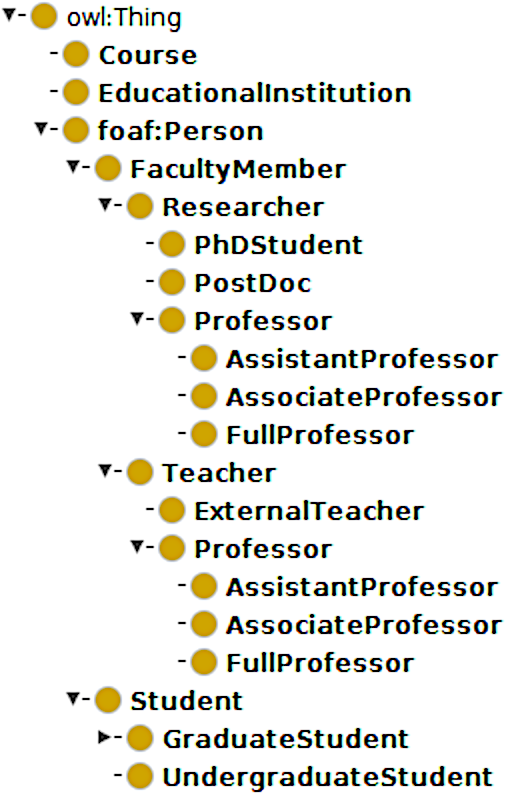
- In the tab Object properties you can see the properties attends, isGivenAt, isSupervisedBy, isTaughtBy and teaches (with its two sub-properties givesLab and givesLecture).

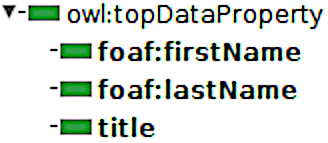
- In the tab Data properties you can see the properties firstName, lastName and title.
# Mappings
- Go to the Window -> Tabs -> Ontop mapping tab
- Test the already defined connection configuration using the Test Connection button
- Switch to the Mapping Manager tab in the ontop mappings tab
- You should see a first mapping assertion called uni1-student
- Double-click on it to observe it and then close this pop-up window.
# Mapping uni1-student
- Target:
:uni1/student/{s_id} a :Student ;
    foaf:firstName {first_name}^^xsd:string ;
    foaf:lastName {last_name}^^xsd:string .
- Source:
SELECT *
FROM "uni1"."student"
Some remarks:
- The target part is described using a Turtle-like syntax while the source part is a regular SQL query.
- We used the primary key
s_idto create the IRI. As we will see later, this practice enables Ontop to remove self-joins, which is very important for optimizing the query performance. - This entry could be split into three mapping assertions
:uni1/student/{s_id} a :Student .
:uni1/student/{s_id} foaf:firstName {first_name}^^xsd:string .
:uni1/student/{s_id} foaf:lastName {last_name}^^xsd:string .
Let us now add the other mapping assertions by clicking on create:
# Mapping uni1-academic
- Target:
:uni1/academic/{a_id} a :FacultyMember ;
    foaf:firstName {first_name}^^xsd:string ;
    foaf:lastName {last_name}^^xsd:string .
- Source:
SELECT *
FROM "uni1"."academic"
# Mapping uni1-course
- Target:
:uni1/course/{c_id} a :Course ;
    :title {title} ;
    :isGivenAt :uni1/university .
- Source:
SELECT *
FROM "uni1"."course"
# Mapping uni1-teaching
- Target:
:uni1/academic/{a_id} :teaches :uni1/course/{c_id} .
- Source:
SELECT *
FROM "uni1"."teaching"
# Mapping uni1-registration
- Target:
:uni1/student/{s_id} :attends :uni1/course/{c_id} .
- Source:
SELECT *
FROM "uni1"."course-registration"
# Mapping uni1-fullProfessor
- Target:
:uni1/academic/{a_id} a :FullProfessor .
- Source:
SELECT *
FROM "uni1"."academic"
WHERE "position" = 1
Then proceed in a similar way for the other positions (associate professor, assistant professor, external teacher, postdoc).
# SPARQL
- Run Protégé and go to the Window -> Tabs -> Ontop SPARQL tab
- Select Ontop in the Reasoner menu
- Start the reasoner
- Add a query in the Query Manager and run the following query in SPARQL query editor:
PREFIX : <http://example.org/voc#>
PREFIX foaf: <http://xmlns.com/foaf/0.1/>
SELECT DISTINCT ?prof ?lastName {
  ?prof a :FullProfessor ; foaf:lastName ?lastName .
}
Tip: do a right click on the SPARQL query field to visualize the generated SQL query.
# Inference
Ontop embeds some inference capabilities and is thus capable of answering a query like the following:
PREFIX : <http://example.org/voc#>
SELECT DISTINCT ?teacher {
  ?teacher a :Teacher .
}
These inference capabilities can be, for a large part, understood as the ability to infer new mappings from the original mappings and the ontological axioms (e.g. Professor is a sub-class of Teacher). We will discuss it later in this tutorial.